


HOME|Ideas and resoueces for planetary science experiments|Determining Subsurface Crater Structure
宇宙の実験教室
Ideas and resoueces for planetary science experiments
カテゴリ
Category
- 実験教室Idea and Resources for Space science experiments
- 対象項目別Category: Contents
- 学年単元別Category: Study Age
-
- 実践授業Activity Reports
タグ
Tag
 クレーターの地下構造を調べよう
ねらい
衝突クレーターの地下構造はどのようになっているかを理解しましょう。
月や惑星・衛星の表層には,衝突クレーターが多数あります。これは、隕石などの小天体が表層に衝突して形成した穴です。
隕石の衝突によってクレーターができると、地面の下ではどのような変化がおきるでしょうか?
このモデル実験では、色砂を層状に敷き詰めた容器に鉄球を落とし、衝突時の様子を再現します。色砂がどのように移動するのかを確認して、クレーターが作られたときの地層の変化も観察することができます。
実験方法
用意するもの
乾燥砂・鉄球・箱・巻尺・定規・ノギス・油性速乾性カラーペンキスプレー・ビニール袋・ノコギリ・カッターナイフ・寒天・鍋・水・ガスコンロ・アクリル板
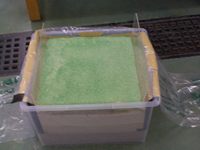
標的を作ろう
クレーターを作る地面を作ります。
- 乾燥砂をスプレー型ペンキで着色し、色砂を作ります。
- 箱にビニールシートを敷きます。
- 鉄球衝突の影響が底面に伝わらないように、箱の底には無着色の砂を多量に敷き詰めておきます。
- クレーターの形が崩れるのを防ぎ、容器全体に寒天溶液がしみわたるように、箱の側面にアクリル板を差し込みます。
- 3の基礎砂層の上に1の色砂を約数mmの厚さで層状に敷き詰めます。
 |
 |
| 標的の表面 | 標的の断面 |
クレーター表面の観察
- 鉄球を落下させます。
- 表層のクレーター放出物の分布を観察しましょう。
クレーター断面の観察
- 寒天液を作ります。(砂の全体量の約30%の寒天液が必要)
- 寒天液が熱いうちに、標的容器のビニールシートとアクリル板の間に注意深く注ぎ入れます。そのまま自然乾燥させます。
- 半固化状態まで乾燥したら、容器から標的をビニールシートごと取り出し、カッターナイフで切断します。
- 層構造の変化を観察しましょう。
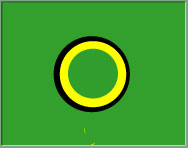
実験前の予想
鉄球を落下させたら、標的の表面と断面はどう変化するか予想してみましょう。
| 表面の予想図 | 断面の予想図 |
 |
 |
自分の考えを書こうそのまま色砂層にめりこんでいって、鉄球の上に後から表面の緑色の砂がクレーターのふちをすべり落ちて鉄球の上におおいかぶさると思う。 | |
実験結果
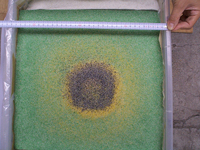
クレーター表面とクレーター断面の観察結果をまとめましょう。
色砂はどのように移動したでしょう?クレーターの中心部と外側とに注目して観察しましょう。
 |
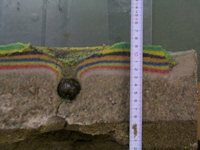 |
この写真は、直径4 cmの鉄球を高さ約5mから落下させて作ったクレーター(左)とその断面(右)です。鉄球を落下させる前の色砂の層の厚さは、数mmです。
写真を見ると、色砂の移動した様子が見られますね。クレーターの外側では表面から緑ー黄ー黒の順番になっていますが、クレーターの中心から縁(リム) にかけては、黒ー黄ー緑の順番になっていて、第1層から第3層までの地層が反転している様子が確認できます。
どうしてこのようなことが起こるのでしょう?
これは、クレーターの中心で表面に近いほど衝突地点に近くなり、大きいエネルギーをもらい、水平方向に遠くまで飛ぶからです。
実験結果は予想した構造になったでしょうか!?
実践授業:宮教大サイエンスアドベンチャー
http://rika.miyakyo-u.ac.jp/jigyo/open.html
Determining Subsurface Crater Structure
Introduction
Investigation of the subsurface structure of impact craters
There is a large number of craters on the surface of the Moon and planetary satellites. These were produced by the impact of small bodies such as meteorites.
Apart from the obvious surface changes, will there also be changes to the subsurface material underneath the point of impact?
In this experiment, an iron sphere is dropped into a bucket containing stratified layers of coloured sand. By seeing how the layers of sand move during the impact, it is possible to observe subsurface changes.
Experimental Method
Things to Prepare
Dry sand; iron sphere; bucket; tape measure; ruler; callipers; quick-drying oil-based spray paint; plastic sheet; scissors; agar solution; gas cooker; acrylic board
Preparation of the Target
Here we prepare the ground where the crater will be formed.
-
Apply colour to the sand using the spray paint
- Use the plastic sheet to line the bucket
- Put a deep layer of grey sand into the bottom of the bucket to ensure that the effects of the iron sphere's impact do not reach the bottom of the bucket
- Insert the acrylic board into the side of the bucket. This ensures that the crater shape is preserved, and allows the agar water to extend across the whole bucket.
- Add layers of coloured sand of 6-8 different colours. Each layer should be 3-4mm thick.
|
|
| Top view of target | Cross-section of target |
Observation of Crater Surface
- Drop the iron sphere onto the target
- Observe the distribution of crater ejecta on the surface of the target
Observation of Crater Cross-Section
- Prepare the agar solution. The required volume will be 30% of the total volume of sand.
- Pour heated agar solution onto the target between the acrylic board and the plastic sheet. Allow to dry.
- Once the target has dried to a semi-solid state, remove the plastic sheet with the help of scissors.
- Observe how the sand layering has been changed by the impact.
Prediction of Subsurface Crater Structure
Try to predict what changes will occur to the target surface and interior during the iron sphere impact
| Surface Prediction | Cross-Section Prediction |
|
|
Write your predictionsThe diagrams above predict that the uppermost green layer slides off the sides of the crater as it is forming and is carried on the back of the iron sphere some distance below the surface. This movement of the surface layer exposes the yellow and black layers below around the rim of the crater. | |
Experimental Results
The next step is to make observations of the changes in the target surface and cross-section.
Note how the coloured sand has moved in the centre and exterior of the crater.
|
|
The photographs above show the surface (left) and cross-section (right) of the crater formed from the impact of a 4cm diameter iron sphere dropped from a height of 5m. Before impact, the layers of coloured sand were each 4mm thick.
From these photographs you can see how the layers of coloured sand have been moved by the impact. In the region outside the crater rim, the yellow layer has become visible, the rim is completely yellow, and inside the rim is mostly black. Hence we see that at the surface the 2nd and 3rd layers of sand have replaced the top layer.
What is the meaning of these observations?
From this experiment we can see that the surface material closest to the centre of the crater has travelled the greatest distance during impact, so has received the most energy.
Was the experimentally observed crater structure what you expected??